|
Selecting/Installing
the Right Pump
by
Peter Gennaro Camac Industries
The key to selecting the right pump is to gather as much data as
possible relating to your application.
The data required can be classified into several categories. Capacity
The pump capacity is
simply the volumetric flow rate expressed in suitable units such as gallons
per minute, gallons per hour, etc. Suction Piping
It is important to determine if the inlet piping
is large enough for the required flow rate and whether the pump has enough
suction lift to draw the solution up the required height. Make sure there is adequate solution to
avoid starving the pump and damaging the seals; if not, specify what method
of priming will be used or select a self-priming pump. Discharge Piping
This information is
required to determine the total height the solution will be lifted (feet of
head), taking into consideration all fittings, horizontal runs and pressures
the pump will be working against (filters, spargers,
spray assemblies, etc.) Feet of head is another way of expressing pressure (Tables
I and II). Solution to be Pumped
In order to select the
proper material of construction of the pump and make the correct seal
selection, it is important to specify the temperature of the solution and
concentration of the chemicals that make up the bath. When making a seal selection, it should be
noted if solids are present or if the solution crystallizes, in which case a water flushed seal would be required. The specific gravity (ratio
of the weight of a given volume of liquid to the same volume of water) and
viscosity (thickness or resistance to flow) both affect the horsepower of the
motor, discharge head and how the priming of the pump will be accomplished. Duty Cycle
The duty cycle is
important in determining the pump controls and piping. It shows how the pump will be used when
placed in service. Electrical
Electrical
requirements are to be specified to select the proper motor and ensure that
proper electrical service is available. Position of Pump
These
details relate to the physical layout and permit proper specification of pipe
fittings to and around the pump. Environment
This
once again relates to selection of the right motor for chemical,
explosion-proof, drip-proof or totally enclosed applications. Installation
Now
that you have purchased the correct pump for your application, it is
important that the proper plumbing be installed to insure trouble-free
service with a minimum of maintenance.
It should be noted that plumbing suitable for metal pumps may not be
applicable for plastic pumps and may even cause damage to the pump. It
is recommended that all piping to plastic pumps be properly supported to
avoid applying stress on the pump. A
heavy unsupported pipe can exert enough leverage on a plastic pump to cause
cracking and misalignment which will cause leaking and premature motor and
seal failure. Upon
completion of the piping, it is important that all inlet connections be
inspected to make sure they are air-tight.
It should be noted that even the slightest air leak can cause the pump
to run dry or overheat the seal cavity.
The use of teflon tape and joint compound
will help to insure that all the connections are air-tight. Another
area of importance when installing the piping is the number of fittings used
between the pump suction and tank. All
centrifugal pumps should be installed as close to the tank as possible and
the number of fittings (valves, strainers, elbows, tees)
should be kept to a minimum. Each fitting
used will cause a slight pressure drop and the total of all the fittings used
can cause enough pressure drop to reduce the flow to
the pump to the point where premature seal failure will occur. When
the pump is used to empty a tank, it is recommended that an automatic
shut-off device be installed to stop the pump when the liquid being pumped
has been exhausted to prevent the pump from running dry. If it is impractical to use such a device,
the pump should be equipped with a water flushed seal to avoid damage from
running the pump dry. Several
recommended piping installations are shown in Figs. 1 to 3. Maintenance
Once
the pump has been properly installed, a maintenance program should be set up
to ensure trouble-free operation.
Suction and discharge piping should be checked for leaks and seals for
both leaks or built-up crystallization of solution
around the seal cavity. It is much
less expensive to replace a set of seals than to have the pump fail and
replace the entire pump or lose a tank full of solution. If
the proper pump has been purchased and installed properly, then with periodic
maintenance you can look forward to years of trouble-free operation. Table
I. Water
Pressure to Feet Head
Pounds Per Feet Pounds
Per Feet Square
1 2.31 100 230.90 2 4.62 110 253.98 3 6.93 120 277.07 4 9.24 130 300.16 5 11.54 140 323.25
6 13.85 150 346.34
7 16.16 160 369.43
8 18.47 170 392.52
9 20.78 180 415.61 10 23.09 200 461.78 15 34.63 250 577.24 20 46.18 300 692.69 25 57.72 350 808.13 30 69.27 400 922.58 40 92.36 500 1154.48 50 115.45 600 1385.39 60 138.54 700 1616.30 70 161.63 800 1847.20 80 184.72 900 2078.10 90 207.81 1000 2309.90
NOTE: One pound of pressure per square inch of
water equals 2.309 feet of water at 62°Fahrenheit. Therefore, to find the feet head of water
for any pressure not given in the table above, multiply the pressure pounds
per square inch by 2.309. Table
II. Feet Head of Water to PSI
Square
1 .43 100 43.31 2 .87 110 47.64 3 1.30 120 51.97 4 1.73 130 56.30 5 2.17 140 60.63
6 2.60 150 64.96
7 3.03 160 69.29
8 3.46 170 73.63
9 3.90 180 77.96 10 4.33 200 86.62 15 6.50 250 108.27 20 8.66 300 129.93 25 10.83 350 151.58 30 12.99 400 173.24 40 17.32 500 216.55 50 21.65 600 259.85 60 25.99 700 303.16 70 30.32 800 346.47 80 34.65 900 389.78 90 38.98 1000 433.00
NOTE: One pound of pressure per square inch of
water equals 2.309 feet of water at 62°Fahrenheit. Therefore, to find the feet head of water
for any pressure not given in the table above, multiply the pressure pounds
per square inch by 2.309.
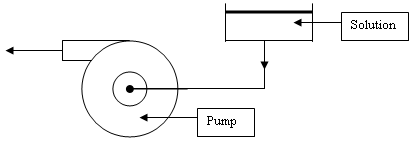
A. Discharge is in the top horizontal position. This is done to avoid any air pockets in
the pump. B. Flooded suction. C. Inlet to pump should be at least ½” larger than
inlet of pump. D. Water flushed seal is recommended if there is a
chance that tank could be drained completely causing damage to seal by
running the pump dry. Fig.1.
Installation No. 1: Excellent
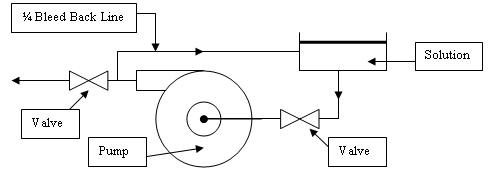
A. On many applications it is desirable to use a hand
valve or automatically operated valve on the discharge line. It is the nature of a centrifugal pump to
generate heat within the volute case when the valve is closed or throttled
back. This heat can be enough to cause
damage to the seal. To avoid this, a
¼” bleed line should be installed as shown above to dissipate the heat
generated. B. When a valve is used and a bleed line is not
practical, the pump should be installed with a water flushed seal. This will prevent the pump from overheating
and protect the pump should the valve be closed with the pump running. C. See A through D in Fig. 2. Fig. 2.
Installation No. 2: Excellent
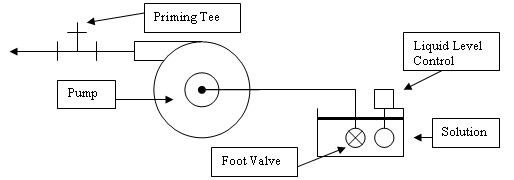
A. As per the above diagram, install a foot valve and
priming tee and make sure the pump is fully primed before starting. B. Install a liquid level control to avoid running the
pump dry and have the pump equipped with a water flushed seal for extra
protection. C. See A and C in Fig. 2. Fig. 4. Installation No. 3: Very Good |